Monday, November 30, 2009

Cool Wall Paint Designs

Home is the place which gives you feeling of warmth and comfort after a long tiring day. The wall paint colors can make your home look elegant or funky as per your desire. It has been proved that colors of the walls affect us psychologically. Some colors gives warmth will others provide cooling effect. Since the wall color room can be changed easily so it is considered as the best way of experimenting with different interior ideas. There are various types of wall paint design available in the market which you can incorporate in your home to give it a complete makeover. Wall stenciling is one of an interesting wall painting technique which uses cutout or templates to create a design. Later on these stencils are removed and the pattern remains there. You can create any type of pattern through this technique like stars, animals, flowers and many others. This process if very simple and will make your walls look entirely different.

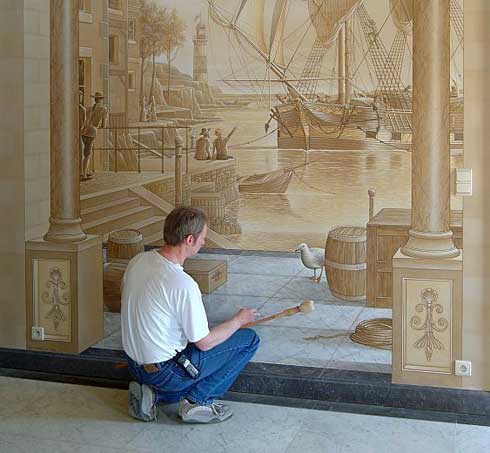
Another type of wall painting design is faux painting which actually means false painting. In this type of design you can create an illusion of materials like marble, granite, wood and others using the paint. Rubber stamping is another cool design which is fast, easy and above all looks impressive. Besides these you can also go for accent walls, stripes, trim, graphics and many others. No matter whatever design you may choose but always go for the right type of color which suites the pattern and also goes well with the overall looks of the room. Avoid very bright colors until and unless you want to make the walls as the focal point of your rooms. It is always better to go for the neutral shades of your choice.

Seven Things You May Not Know

About a month ago a fellow blogger, Emmie of Aspirations of a Southern Housewife, gave me a Kreativ Blogger Award. Emmie writes a wonderful blog, do stop by and check it out!
Thank you Emmie for nominating me. You need to share seven things about yourself. I tend to be a rather private person, so I have been hesitant, but here they are in no particular order.
I am an incredible procrastinator but also an over achiever/Type A personality. This causes me lots of stress in my down time but very concentrated blocks of productivity during my work time.
I am half Italian and half Portuguese, My grandparents on both sides came to America in their youth and spoke only broken English. I love my heritage. I am very expressive and passionate about life, actually about almost everything.
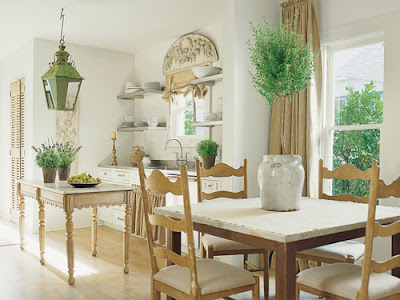
Of all the areas of design my favorite is kitchen design and spacial planning. I really should have been a kitchen designer; perhaps someday I can play one on TV.
I have an incurable antique furniture habit. My basement and attic are filled with furniture that will someday find the perfect home - but until then happily reside in spaces above and below where we actually live.
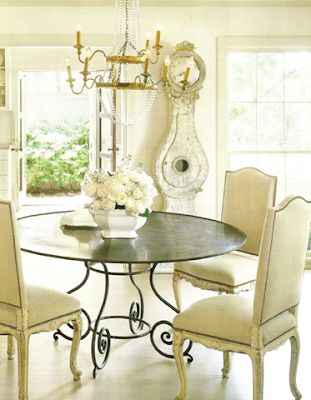
I love puppets. I wanted to be a Puppetry major in college but my parents thought it was irresponsible. Instead, at their urging, I entered college as Accounting major (what a laugh!)
I am a mother of two beautiful children. They are amazing people and they make me laugh everyday. I can not imagine what my life would have been like with out them.
I believe we are all connected somehow and that we need to be good to one another. I try to be a better person every single day.

I am also suppose to nominate seven other blogs for this award, but I am interested in so many blogs I couldn't possibly choose. So, if you would like to share anything about yourself, please consider yourself nominated. I would love to know more about YOU!
xx-Gina

Sunday, November 29, 2009

Busy Little Elves!


We've been busily creating special holiday things for the Sand Point Antique & Design Market in Seattle next weekend...

Any guesses what these are?!

Yep... stockings! I heard that recent shipments of Joan d' Arc Living products are low on burlap stockings, so I am determined to have lots of them to offer lovers of Scandinavian style.

I've made some brand new 'Ice Queen' Crowns, too, and I just looove those vintage 'ice chunk' crystals we found at the Rose Bowl. We'll have more ornaments & decorations, and our signature 'upcycled' home furnishings & accessories - Bob is busy out in the shop, creating more of his fabulous pieces for you to enjoy!

We hope to see you at Sand Point next Sunday!

Friday, November 27, 2009

Interior Painting Tips - Painting Behind Bathroom Toilets

Painting in tight quarters can prove to be difficult and aggravating in itself, but when it comes to painting behind a toilet things can get messy. Most folks just brush around the toilet then roll the paint up to the area that has been brushed out. There are a couple of problems with this technique in that the brush cannot get all the way behind the toilet. This leaves for an area that has not been painted and when standing in front of the toilet you can see this area, which does not look good. Another issue with this technique is that when using a brush it leaves brush marks in the paint when it dries, revealing an area that does not blend well. However, there are still a couple of options left for painting behind a bathroom toilet which can be explored.

One of these options would be to remove the toilet from the bathroom. However, when doing this you must know how to get the toilet back in and working properly or consult with a plumber to do it for you. Underneath the toilet is a wax ring that will need to be replaced when putting the toilet back or it will leak.

What I have done in the past is just remove the tank itself. The water must be emptied out of the tank and the water shut off valve must be turned off. Once this has been completed just unscrew the two nuts holding the tank on. When replacing the tank you should buy new nuts and bolts for the tank, some are metal some are plastic. Obviously plastic will not corrode and rust, making for a better fit.

Just remember if you do not feel comfortable working with your toilet to just consult with a professional plumber. And always work safely there by minimizing potential accidents.

Another option, which I feel is the best, would be to use the correct tool for the job. Most of the time when painting the wall behind a toilet there is a small amount of space back there where a small roller can fit. These rollers can be purchased at any of the large home supply stores and are very inexpensive. "RollerLite" is one of them and works very well because it is made of the same fabric the normal 9 inch roller sleeves are made of. These mini fabric rollers come in the same nap sizes that the traditional 9 inch sleeves come in to ensure the paint will blend in seamlessly. You also have the option of getting a handle that can easily reach down behind the toilet. So for your next interior painting project that involves a painting bathroom walls this is the best suggestion I have as a solution to getting around the toilet.

Holiday Decorating with Antique Grainsacks

Everyone who regularly reads Willow Decor knows my love (obsession?!) with antique grainsacks. So can you imagine how excited I was when textile artist, Kym Fraser, of 3 Fine Grains sent me photos of her new Antique Grainsack Holiday Collection.
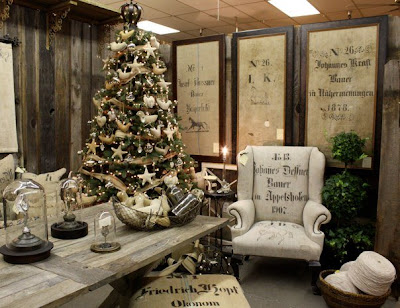
Kym transforms authentic antique German grainsacks, hessian and french jute into gorgeous pillows and throws, but what to do with the small scraps of the precious material that is left over? Well Kym has designed these extra pieces of history into the most wonderful Christmas ornaments and stockings.
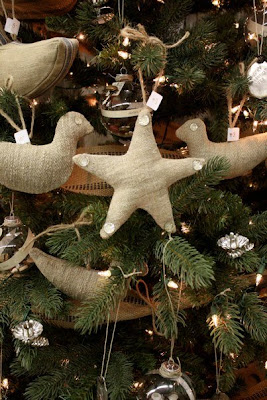
Above is her Christmas star made out of French Hessian with real antique glass buttons.
Another star fabricated from a striped German grainsack.
One of my favorite designs is the Dove. This lovely little gem is made from 100 year old antique linen and an antique glass button eye.
Hanging in front of the Dove is an antique button over an antique spoon ornament.
Here's another one for that special mother in your life - (I hope my children are reading this!) Plain small hearts and large hearts are also available, as well as partridges. Kym's ornaments range from $10 to $15.
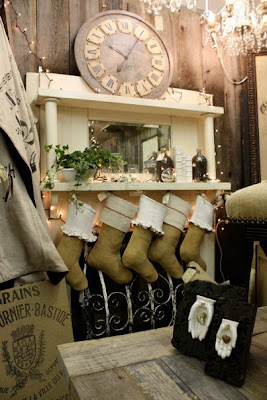
My other favorite items in Kym's Holiday Collection are her antique hessian and French jute stockings.
They come with a ruffled or striped cuff made from 100 year old antique linen. The striped stocking is $65 and the Ruffled $75. Surely Santa would appreciate these beauties and pack them full of goodies!!
Finally, an antique German grainsack finds new life as Christmas tree. Contact Kym directly for more information on this one of kind item. Notice that Kym also used jute upholstery webbing as garland for her tree. You can learn more about using jute upholstery webbing in home decor in my post here. 
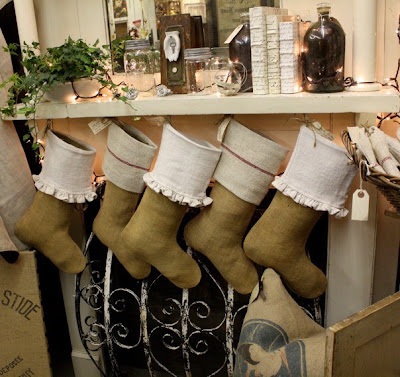
Now here is the exciting part; contact Kym between now and December 6 and mention Willow Decor in comment line and you will receive 10% off your purchase. If you are interested in any of these items please contact 3 Fine Grains. Happy decorating!!!
.

It's Time...


Thanksgiving is done, the turkey is history, and the pumpkins are packed away.
Now it's time to haul in the bins of vintage Christmas & Winter decor! We are spending our weekend Decking the Halls of our beach cottage with winter whites. We are so inspired by this color palette right now - we will also be featuring it in our booth at the Sand Point Antique & Design Market next Sunday. We'll share photos next week - meanwhile, enjoy the Holiday weekend!

Wednesday, November 25, 2009

Living Room Interior Design - Tips That Leads To A Relaxed Visit

Your living room interior designs should be something that you really like. That is why it is important to consider the homeowner's personal interest and styles when it comes to living room interior design.

There are several things you have to consider before coming up with living room interior design. Here's the list:

1. Organization

Have you ever wondered why interior designers and decorators seem to work on designing and decorating homes so easy? It is simply because they have a process to follow. They are organized with their plans that they incorporate the elements of designs in a timely manner.

So before you start incorporating your living room interior designs, ensure that everything is all planned.

2. Color

The color spectrum of every material used in your living room is an important factor to consider when incorporating living room interior design. It is best to use colors in a discreet, natural range so they can perform their tasks as backdrops or settings for striking information displays and environments.

Moreover, considering appropriate choice for colors when creating living room interior designs tend to offer a relaxed atmosphere to entertain visitors during their stay.

3. Furniture

Comparable to the outlook structural design, the well thought-out utilization of the furnishing elements in the living room, such as sofa, accent chairs, coffee tables, etc., correspond to a central and significant detail within the living room interior design.

When equipping your living room, make sure that the furnishing details are applicable and should match the other elements in the living room interior designs.

For example, it is best to combine materials in glass, metal, and wood; glass, metal, and dyed plastic; or glass, wood, metal, and dyed leather for your sofa, accent chairs, and tables.

4. Dividers

Your living room, without proper wall dividers will look barren and bleak. To soften the look, it is best to come up with living room interior designs that will enhance the vertical architecture of the room.

The desired items for dividers are materials with etched, brushed, or matte finish as well as metallic items.

Dividers tend to create special enclosed areas within the living room. For example, you can use dividers to separate the living room from the other parts of the house. In this way, you can easily set the area apart from the others without having to spend more and consume more spaces.

Good Day, Sunshine!


We awoke to this glorious sight this morning.....
                                       
No alarm, no shocking sound nudged us from sleep.... nope. Just opened our eyes to a quiet peaceful morning, and discovered this beautiful rosy glow in the sky to greet us.

Now this may not seem like anything special to some of you - but remember that we live in the Great Gray NorthWest and haven't seen the sun or the actual sky for weeks now! It's been nothin' but gray clouds and rain. And wind. Lots of wind. So seeing this was a real treat, in more ways than one....
                                                      
We've asked the Universe a few questions lately.... mostly having to do with what our next step is. Our biggest concern is missing an opportunity, or not being clear on what to do next. Last night we went to sleep with one particular question on our minds. This morning's light show was like an answer straight from God: "If I can wake you up so you won't miss something as beautifully simple as this sunrise, don't you think I'll make sure you notice the opportunities and path before you?" Indeed!

We wish you all a most meaningful, wonderful, and Happy Thanksgiving, friends. We are so grateful for your friendship, support, and presence in our lives. You inspire us to be all that we can be, and to contribute to this marvelous world in a way that makes it better for everyone. Thank you for visiting us, coming to shows, reading our blog, and connecting with us. Blessings to you all....

Monday, November 23, 2009


The new magazine is on its way - debuts in February!
Stay tuned to the Flea Market Style Mag blog for more details

Velvet & Linen Brickmaker's Table Voting

Today starts the voting for Velvet and Linen's Brickmaker's Table Giveaway. I was fortunate to be asked by Brooke Giannetti of V&L to be part of the judging that narrowed down the choices from 170 rooms to 10 finalists. The top three rooms with the most votes will receive the Brickmaker's Table from Restoration Hardware; a gorgeous table designed by Mark Sage. If you get a chance, do stop by and cast your vote. The top ten are just a small representation of all fabulous spaces that were entered. I'd love to hear which ones are your favorites! Click here to see them and vote!

Sunday, November 22, 2009

Pendant Lighting

Pendant lighting fixtures are suspended from the ceiling and get their name from the jewelry accessory of the same name. Pendant lighting has a distinctive appeal and is considered perfect for places like kitchen islands, desks, breakfast nooks and the like. Pendant lighting can be either a single pendant lighting fixture or two or three different ones teamed up to provide a dramatic effect. Generally when two or three pendant lighting fixtures are teamed up, mini pendant lighting fixtures are used. The area of pendant lighting provides a lot of scope for the use of creative designs and ideas.

It is advisable to mount pendant lighting fixtures at least 24" to 30" above the area to be lit. When mini pendants are used, the ideal height would be 18" to 24" above the surface area to be lighted. When two or three pendants are used, an adjustable pendant bar can be used to fix them at different heights. This makes it possible to adjust heights from time to time, varying the overall lighting effect in the process.

Pendant lighting fixtures are available in various styles. Some of the commonly seen styles are sleek clean designs, reflective stained glass and crinkle glass designs. Pendant lighting fixtures are task oriented and provide necessary lighting for specific areas. The intensity of light needed can be dictated by the choice of bulb used inside the pendant lighting fixture.

Most pendant lighting fixtures are available with chains and rods that enable adaptation for different heights. Multiple pendant lights in a single fixture at staggered heights create a dramatic effect and are ideal for use little corners of large rooms. This kind of lighting creates an interesting area in an otherwise ordinary room.

Pendant lighting fixtures made of hand blown glass are available starting around $30, with some costing $500 and above.

Differing budgets and lighting needs can be catered to efficiently by the imaginative use of pendant lighting.

Swanky Season: Retreat Style


So Mr. Deb is a saint to put up with me, we all know that..
But last year, I think he outdid even himself. I swanked up the tree and the house with the au courant theme of the year: Black & White and Hip all over, and he let me have carte blanche with everything! (Considering that we moved into our house on November 5 and left for Texas on December 11th, I'm still amazed that I decorated for Christmas at all last year...) Here are a few shots of how it turned out:


These crystal snowflakes and the flocked ivory & white ornaments from up above - and also seen in the 'Tattered & Torn' style a few posts back - will play into our Winter White theme for this year, too. Which just goes to show that the way you mix things up can change the look completely! (We will also feature the white tree - AFTER we are done using it as a display prop at the Sand Point Market on December 6th...)

Blog Archive